This year I decided that I wanted to try to grow hops. I love homebrewing and growing hops just seemed like another adventure within the hobby. From what I read, it seemed like hops would pretty much grow anywhere and would grow like weeds.
I ordered 3 rhizomes from Crannog Ales. I think it was like 6 bucks a piece. I pre-ordered them in like February I believe and they finally showed up at the end of April or beginning of may. As soon as I got them, I planted them.
I built a little trellis thing with string attached for the hops to climb.
I'm hoping I get enough hops for one batch, maybe I'll do a wet hopped ale, we'll see. I'd be happy if I got at least a few hop cones.
Here are some pics:
Wednesday, June 22, 2011
Saturday, May 14, 2011
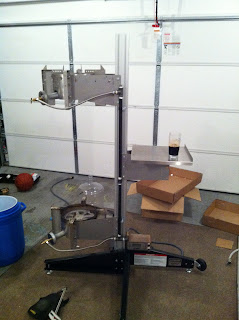
My Blichmann Top Tier
I first was intrigued by the Blichmann TopTier from watching BrewingTV episode 17. Then I saw a few videos from user mawelge on youtube. Once I get an idea in my head, I just have to have it. I didn't want to rush and order it. I've used to just buy whatever I want on credit and make up a plan to pay it off later. This time I actually decided to save the money first.
The Top Tier is an expensive piece of equipment. Like many Blichmann items. The stand itself is $500, each burner tier is $140, and a shelf tier is $60. My configuration came out to $840 using 2 burner tiers and 1 shelf tier. I saved my money from September to March, and finally had enough to get it, along with a few other things.
The set up took me about 8 hours. It's fairly easy to set up but can take a long time if you want to make changes. At first I had the stand set up with the 2 burners on the left side and the shelf on the right side. Then I thought that I didn't want one burner under another because it would be steaming for an hour up underneath the other burner. It's probably not a big deal but I didn't feel comfortable with it. I moved the HLT burner to the back. This took time because I had to reconfigure the legs on the burner and the gas manifold which had already been done. I was happy I reconfigured it.
So far I've done 2 brews on the TopTier. The first was a 10 gallon batch of an amber ale recipe I made up. Half it to be dry hopped and the other half as is. The second batch was a 5 gallon batch of stout. So far, I'm really pleased with it. It's a lot of fun to use and seems to make the brewday more efficient. I like how my therminator bolts right into the stand too. So far I've been using it just with gravity. The HLT burner is high, but definitely not un-manageable. My plan is to get a march pump so that I can move the burner down and make vorlaufing and transferring to the boil kettle faster and easier.
My only complaint about the TopTier is having to move it from the garage to the backyard. On the side of the garage is rocks, which makes moving it tough, I plan to either cement in the area or get air tires for the Top Tier.
Here are a bunch of pics:
Monday, April 18, 2011
Blichmann TopTier Quick Overview
I just got my new Blichmann TopTier last week and got it all set up and have had one brew session on it so far.
Here's a quick video on it:
I'll go into more detail later on
Here's a quick video on it:
I'll go into more detail later on
Sunday, March 20, 2011
My chest freezer - for carbing, cold crashing, and fermenting
Last summer I was having a heck of a time keeping my beers fermenting in an acceptable fermentation range. The general range is usually around 64 - 72 degrees Fahrenheit. Unfortunately since it was summer, the temps were more like 74 - 78 degrees. I kinda solved the problem by putting the fermenters in a bucket filled with water and ice bottles. This would bring the temp down to an acceptable range, but was quite a hassle and was usually hit or miss.
Once the season turned to fall and the garage was back to acceptable fermentation temperatures, I decided I needed to get a chest freezer to ferment in. I had seen a number of threads on homebrewtalk.com where people had showed off the fermentation chamber. Sometimes people used a freezer or fridge, and sometimes people built these contraptions with insulation attached to a mini fridge.
I went on craigslist and found myself a nice old 16 cubic foot chest freezer. I only paid 40 bucks for it. Now it is probably from the 70's or 80's, but it gets the job done. The people were probably happy I paid them to haul it away for them. Anyways, I got myself a johnson temperature controller from Northern Brewer, hooked it up to the freezer, and I currently have it set at a range from 35-39 degrees. In the summer I'll bump it up to 65-69 or something like that.
Right now I'm using the chamber to crash cool my beers after secondary fermentation and to house and carb up my kegs before I take them inside to the kegerator. It can easily hold my 5lb co2 tank, and about 6 corny kegs, or a few better bottles and a couple kegs, depending on how the beer pipeline is doing.
I originally got my kegging gear from kegconnection.com. That is a great store with great products, service, etc. However, a few months back my co2 bottle with regulator fell over and banged up the regulator so the gauge which tells me how much co2 I have left, was not working properly because the faceplate was bent.
So I decided to upgrade. I got a new regulator and hose from Northern Brewer. I really like their set up. They use clear 1/4" tubing for the gas lines. This is way more flexible than the red co2 tubing I had before. They other good thing is that you have the option to get a regulator and distributor with 1/4" MFL shutoffs instead of just having barbed ends. This is way better. So I have a 3 way distributor. Basically so I can carb up 3 kegs at once and it is easy to take off the quick disconnects when I want to use my Blichmann Beer Gun.
Here are a few pics of the system:
Here is a pic of my old regulator and red tubing (which I didn't like so much):
Update - 2011/03/24
I just figured out that kegconnection sells replacement gauges for taprite regulators for like $9. So technically I could have saved myself nearly 60 bucks and just fixed the regulator I already have. However, I do like the MFL things on the new one and I'm glad I replaced the co2 lines, so I don't really mind shelling out the extra dough.
Once the season turned to fall and the garage was back to acceptable fermentation temperatures, I decided I needed to get a chest freezer to ferment in. I had seen a number of threads on homebrewtalk.com where people had showed off the fermentation chamber. Sometimes people used a freezer or fridge, and sometimes people built these contraptions with insulation attached to a mini fridge.
I went on craigslist and found myself a nice old 16 cubic foot chest freezer. I only paid 40 bucks for it. Now it is probably from the 70's or 80's, but it gets the job done. The people were probably happy I paid them to haul it away for them. Anyways, I got myself a johnson temperature controller from Northern Brewer, hooked it up to the freezer, and I currently have it set at a range from 35-39 degrees. In the summer I'll bump it up to 65-69 or something like that.
Right now I'm using the chamber to crash cool my beers after secondary fermentation and to house and carb up my kegs before I take them inside to the kegerator. It can easily hold my 5lb co2 tank, and about 6 corny kegs, or a few better bottles and a couple kegs, depending on how the beer pipeline is doing.
I originally got my kegging gear from kegconnection.com. That is a great store with great products, service, etc. However, a few months back my co2 bottle with regulator fell over and banged up the regulator so the gauge which tells me how much co2 I have left, was not working properly because the faceplate was bent.
So I decided to upgrade. I got a new regulator and hose from Northern Brewer. I really like their set up. They use clear 1/4" tubing for the gas lines. This is way more flexible than the red co2 tubing I had before. They other good thing is that you have the option to get a regulator and distributor with 1/4" MFL shutoffs instead of just having barbed ends. This is way better. So I have a 3 way distributor. Basically so I can carb up 3 kegs at once and it is easy to take off the quick disconnects when I want to use my Blichmann Beer Gun.
Here are a few pics of the system:
Here is a pic of my old regulator and red tubing (which I didn't like so much):
Update - 2011/03/24
I just figured out that kegconnection sells replacement gauges for taprite regulators for like $9. So technically I could have saved myself nearly 60 bucks and just fixed the regulator I already have. However, I do like the MFL things on the new one and I'm glad I replaced the co2 lines, so I don't really mind shelling out the extra dough.
Tuesday, March 15, 2011
Blichmann Boilermaker - Drilling a hole
I use Blichmann Boilermakers as my brewpots. They are expensive, but they are well designed, feature a sight glass, temperature gauge, and a ball valve drain. These features are hard to live without once you get used to them. I believe these are the best pots for homebrewing. I've also made some damn good beer with them as well.
I have 2 boilermakers, one 15 gallon for my brew kettle, and one 10 gallon as the hot liquor tank. I started out with the 10, and recently added the 15 so that I could do the occasional 10 gallon batch.
The only problem I was having was that on the 10 gallon, the brewmometer reading level is at 4 gallons, and on the 15 it is at 6.5 gallons. These levels are perfectly fine for doing a 10 gallon batch. But for a 5 gallon batch, they are both basically useless. For the 10 gallon, the strike water can often be at or less than 4 gallons, so it is not possible to get an accurate reading. For the 15 gallon, the only time the temp will register is at the beginning of the boil.
The only solution is to move the brewmometer. To do so, the first thing I did was order 2 brewmometer hole plugs. That was the easy part. Then it was time to drill the holes. I had a difficult time finding information on the web about doing this. Basically all I read was use a step bit and cutting oil. That is what you need to do but I couldn't find any examples of people doing it on a boilermaker. Since the pots are more than 300 bucks a piece, this is not exactly a simple task mentally.
Well the basic way of doing it is drilling a 3/16th pilot hole, then enlarging it to 1/2 inch with a step bit. You should use a corded drill (not cordless) and cutting oil. If you go slow and keep constant pressure, and as long as the bit doesn't get too hot, it should go fairly smoothly. You could use a cheap 10-20 dollar "titanium coated" bit or a more expensive greenlee bit which will last more than 1 or 2 holes. I took the easy way out and had my handyman uncle do it.
Here are some pics of the final results:
I'm pretty happy with the results. I have the brewmometer at the 4 gallon mark on the 15 gallon boilermaker, and at the 3 gallon mark on the 10. I've used them on one brew so far since and it worked great without any leaks. The pots don't look as good as they did before with the gauges in the stock positions, but they work, and it is more functional for me now.
Here's a video of someone doing it on a converted keg
http://www.youtube.com/watch?v=yH8q6XbiFeI
Subscribe to:
Posts (Atom)